Showing posts with label understanding makeup. Show all posts

Sunday, 13 January 2013

Understanding Makeup Part Three: Face

Finally, the third and final Understanding Makeup post! Again, I apologize for the lack of posting, but it's the end of the semester, which means tons of final projects and lots of studying for exams. Ewwwww

But anywho, this post will be all about face makeup. Let's goooo!

Foundation
Personally, I do not cover my entire face with foundation. I usually just apply it where I have a blemish. This makeup is great for those icky days where you have a zit that is bugging the heck outta you. Foundation is also great for evening out your skin tone. When buying some, always avoid buying one that is way too dark or way too light for your skin tone. There will most likely be someone at the store who can help you find your right shade, so don't be afraid to ask! Foundation can also come in a pressed powder form. The foundation that I am currently using is the Natureluxe Silk Foundation from Covergirl. I've written a review about it already, but just to summerize, it's very lightweight and doesn't make your skin feel tight!
 http://www.covergirl.ca/en_ca/prodimages/natureluxe_liquid_silk_foundation_1.jpg


Concealer
ALWAYS BE SURE YOU BUY ONE THAT MATCHES YOUR FOUNDATION. I capitalized that whole sentence because believe it or not I've seen one too many girls who weren't too smart when they bought their concealers/ foundations. However, I always tell people that it is okay to buy a concealer that is a shade or two darker then their foundation. It's better that way than to have it too light and make it look like one of those terrible 'I fell asleep outside in the sun while wearing sunglasses' looks. Who wants that? Anyways, a good reason to have concealer around is to hide those annoying dark circles most people get under their eyes. Foundation can hide them a little bit, but it is a bit thinner than concealor, therefore it is not the best choice Concealer is also great to cover up any redness you may have around your nose and mouth. I recommend the PhotoReady Concealer from Revlon.
  
Primers
Don't you hate it when you put on your makeup and look all fancy-shmancy just before going out, and when you get home it's all smudged and in places it wasn't before? Ugh, it's terrible. That's why I love primer. Face primer, eye primer, eyelid primer. I personally only use eye lid primer because, like I said before, I don't like to put makeup all over my face. Eyelid primer saves the day for me. It stops my eye shadows and liners from creasing and smudging. When you apply it, it smoothes out your lid to make the job of applying makeup easier and leaves it looking better. The eyelid primer that I would recommend is elf's Eyelid Primer (which by the way, is only $1. ONE WHOLE DOLLAR!) 

http://media.tumblr.com/tumblr_m0awxw9WmE1qzaz2w.jpg

Bronzers/Blushes
I'd have to say that one of the biggest makeup faux-pas trends that are out there these days is the abuse of bronzers. Yes, it will make you appear more tanned, but use too much of it and you'll end up looking like a carrot. I'm sorry but if you want to be darker, I recommend just going out and tanning. Or better yet, love the skin you're in. Embrace it! You don't need to be tanned all year round! I prefer using bronzers as a highlighter to contour my face. Suck in your cheeks and apply to the hollows of them. Then highlight right around your hairline and temples. Finally, make sure you get around your neck and under your chin to make sure your face doesn't end up being darker than everywhere else. For blushes, opt for something that doesn't show easily. And in my honest opinion, I do not prefer ones that shimmer. I don't like the look of a sparkly face. To apply, simply smile and put on the apples your cheeks in a circular motion. Covergirl's line of blush is a great one to use! 

Cheekers Blush

I don't have much to say in terms of brushes, but anything that is soft and doesn't shed is a keeper! 

I hope you guys enjoyed reading these last three posts on makeup, and I certainly hope it has expanded your knowledge on how to apply it, and which tools and products are best to use! Once exams are over with, I will hopefully have more time to post other things. Oh, and I always love hearing your feedback so please let me know what you guys think of how I'm doing so far!

xx Mandy

Tuesday, 8 January 2013

Understanding Makeup Part Two: Lips

I hope you all enjoyed my first Understanding Makepup post!

Tonight's topic is lips. Now, there aren't nearly as many lip cosmetics as there are eye cosmetics. But here are some stuff you may find interesting when dressing up those smackers!

Lip Stick and Lip Gloss
When you want to make your eyes stand out by wearing makeup, you automatically think about what eyeshadow to use, right? Eyeshadows, eyeliners, etc. can help your eyes pop, but did you know that lip stick and lip gloss can also help?

For example, if you have blue eyes like myself, opt for nudes, pinks, and bright reds. For brown eyes, red lipsticks with green, orange, or gold undertones are your bestfriends. And for those green eyes, go for lipsticks that are pink, and ones that have green, red, or brown undertones.

Lip Liners
A must have for all of you lip stick lovers! If you have lips that are a little uneven in one section, a lip liner can save the day. These pencils help fill in those areas, creating fuller looking lips. Also, it stops your lip stick from "bleeding" (moving off of your lips, sort of like smudging on its own... bleh). Try to make sure your liner is close to the shade of lipstick you are using, unless you are going for the "outlined" look, which I personally find a makeup no-no. 

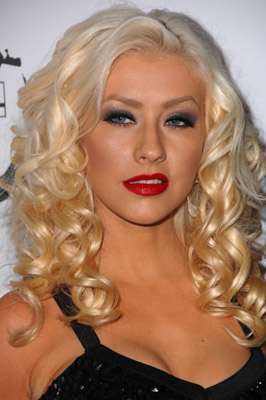
Red Lips
Kim Kardashian

One of the biggest trends out there right now. Red lips give off a bolder, sexier look. I love wearing red lip stick because it makes me look a little older, but not too old.

When wearing a brighter shade of red, try not to over do your eye makeup. The way I see it, it makes you look like a clown. A great combo is a pearl/ beige shadow over your lid, with a simple winged eyeliner to go with your bright red lips.
     
Darker reds are best for night time looks. This is when you can go a bit heavier with your eyeliner and shadows. Try a smokey eye!

I hope you enjoyed reading this post! And remember to keep your lips hydrated by applying a good chapstick with SPF so they won't dry out. I apologize for not posting this the day after my eye makeup post, but school does come first. Hopefully I can get up my last Understanding Makeup post (Face) tomorrow!

xx Mandy

Friday, 4 January 2013

Understanding Makeup Part One: Eyes

Earlier, I decided I was going to do an Understanding Makeup section of the blog, made up of three different posts: Eyes, Lips, and Face. For each post, I will talk about what kind of makeup you can use for the certain area, give descriptions of some of the products, the tools used, and some different looks that you might be interested in.

Eyes
Honestly, any kind of eye makeup is my favourite makeup. I love playing up my baby blues and trying out different styles and colours to make them pop [more].

Eye Shadows   
So many colours, so little time- right? I get extremely overwhelmed when I try to decide what colour I should use that day. Do I want to go blue? Maybe bright green? Ugh, this shouldn't be so hard.

Eye shadow is applied all over the eye lid, the crease, and right under the brow. It adds shape, depth, dimmension, and can sometimes create illusions to make your eyes appear a different way than they are. It can come in many different forms, which are the following:
  • Sheer- a very faint shadow, comes in pressed form
  • Matte- solid colour eye shadow
  • Powder- comes in pressed form and is the most common type of eye shadow used
  • Liquid- applied with a sponge or brush specifically made for this shadow; comes in matte or shimmer
  • Shimmer- has a sparkle or metallic tint to the colour
  • Pigment/Loose Powder- applied the same way as powder shadow, but is not pressed
  • Baked- pressed; marbleized and baked in an oven; can be used dry or wet
  • Cream- creamier than powder; can be shimmery or matte; commonly used as a base on the lid 
  • Pencils- cream eye shadow in a pencil form
Pigment/ Loose Eye Shadow

NYX Jumbo Eye Pencils


Eyeliners
Oh, the eyeliner. So bold and so much fun to use. I prefer liner over shadow because it finishes everything off and can make such dramatic looks. But, you can use an eye shadow as a liner, using a liner brush (see Eye Brushes below).
  • Liquid- hardest to use; best to buy in pen form because you have more control over them
  • Pencil- great for lining your water lines; make sure you have a sharpener for these
  • Gel/Cream- a good creamy eye liner is very bold and shows well
 
Eye Brushes
There are so many different eye brushes that you can use when it comes to applying eye shadow.
SEPHORA COLLECTION - Classic Angled Liner/Eyeliner Brush #15
Liner 
Applies a thin line of colour on the lid and defines the eye; apply right above/on the lashline

SEPHORA COLLECTION - Classic All Over Shadow Brush - Small #22 
All Over 
Great for any area of the eye and most types of eye shadow

SEPHORA COLLECTION - Classic Smudge Brush #14 
Smudge
Blends colours and expand smudge lines   

SEPHORA COLLECTION - Classic Rounded Crease Brush #13 
Crease
Adds colour to the crease; great for smokey eyes

These are just a few of the many brushes used for eye makeup.

Trends
Next time you want to switch up your look, try out these trends!

  Cat's Eye
Often seen on actress Angelina Jolie. While applying eye liner (opt for liquid or gel) on your upper lash line, sweep it out right to where your crease stops (or go farther for a more dramatic look).
Winged Eyeliner
Very similar to the Cat's Eye look, but when you sweep your liner out, bring it up to make a wing. My personal favourite, aswell.
Smokey Eyes
Probably the most popular look of all, not to mention simple. Though it is hard to describe in writing, there are many tutorials on youtube, and it's likely that I will be uploading my own tutorial at some point :) 

Wow, that was a long post. I hope this gives you a bit of an idea of how to use eye makeup. Tomorrow, I will write about how to use lipsticks and how to get that perfect red lipstick look that is in right now. 
xx Mandy


Eye Shadow Types:
http://www.examiner.com/article/what-are-the-different-types-of-eyeshadow-eyeshadow-101

All Eye Brushes are from Sephora:
http://www.sephora.com/